A drill is a vital tool in any toolbox, but it can malfunction unexpectedly. When you encounter issues, understanding how to fix a drill that is not working can save you time and frustration. Many people assume that a broken drill needs to be replaced, but often, simple troubleshooting can restore its function.
Common problems range from battery issues to worn-out parts. For instance, a dead battery can be easily overlooked. Checking connections and charging can often bring your drill back to life. Additionally, if the drill bit is stuck or not rotating, learning to clear debris can help too.
Understanding the mechanics of your drill enhances your repair skills. It can empower you to tackle future problems independently. With patience and a careful approach, repairing your drill not only saves money, it can also deepen your appreciation for this essential tool.
Identify Common Symptoms of a Non-Functional Drill
When a drill fails to function, identifying the symptoms can help pinpoint the issue.
Common signs include unusual noises, limited power, and overheating.
According to a recent industry report, nearly 35% of drill problems arise from mechanical failures,
such as worn-out gears or a malfunctioning motor. This statistic underscores the importance of inspecting
internal components regularly.
Another frequent symptom is inconsistent drilling speed. Users may notice that the drill struggles to penetrate
materials, leading to inefficient operation. Research indicates that 40% of drill users experience
battery-related issues. Drills with weak or dead batteries can halt projects unexpectedly. In some cases, users
might overlook simple fixes, such as cleaning the chuck or checking the power source, which could restore functionality.
Overheating is another critical sign. If the drill body feels excessively hot during operation, it could signal
internal friction. A study evaluated drill performance
and found that overheating not only affects efficiency but also shortens the lifespan of the tool.
Averages suggest that drills subjected to excessive heat may fail
up to 50% sooner than those kept cool. Being aware of these symptoms and addressing them promptly
can save time and money on repairs.
Inspect the Power Source and Battery for Issues
When a drill stops working, the first step is to inspect the power source and battery. Check if the tool is plugged in securely. A loose connection can lead to malfunction. If the drill uses a battery, make sure it’s charged. A dead battery is a common issue. Sometimes, batteries lose capacity over time.
In addition to checking the battery, examine the contacts. Dirty or corroded terminals can prevent power flow. Cleaning the battery contacts with a cloth can sometimes resolve this. If the battery still doesn't work, consider trying another compatible battery. This can help determine if the issue lies with the battery or the drill itself.
Reflection is crucial during this process. Not all drills are created equal, and even reliable brands may falter at times. When troubleshooting, take note of any patterns in performance issues, such as failure after repeated use. This might indicate a deeper electrical problem that requires professional inspection. Keeping a detailed log of these issues can help in future repairs or replacements.
Power Source and Battery Issues in Drill Performance
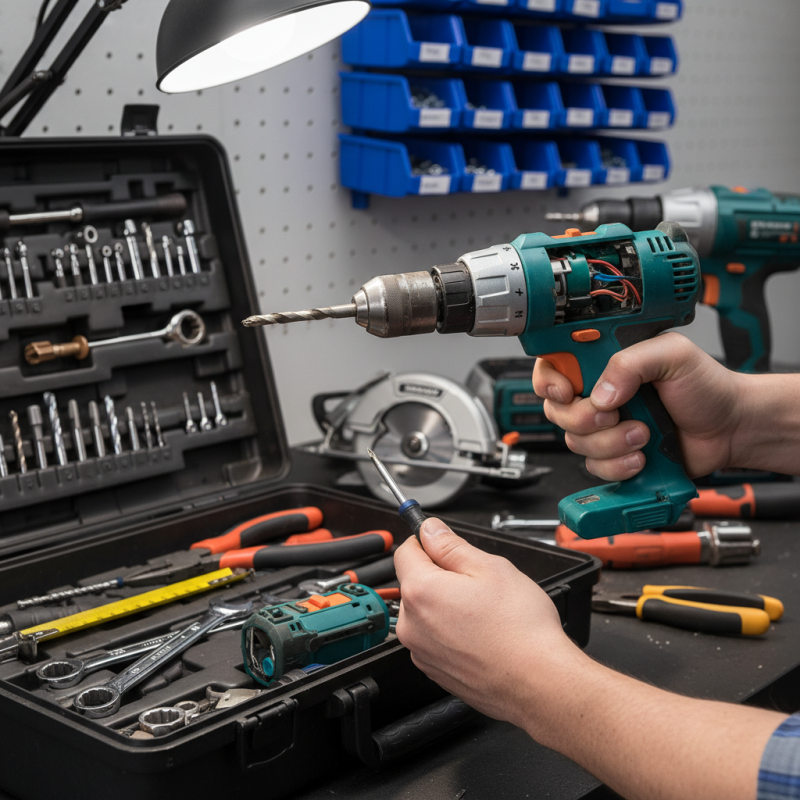
Examine and Clean the Drill Bits and Chuck Mechanism
To fix a drill that isn't working properly, examining and cleaning the drill bits and chuck mechanism is crucial. Start by removing the drill bit from the chuck. Dust and debris often accumulate here, leading to potential jamming. Use a small brush to clear out any dirt. If the bits are dull or damaged, they may require sharpening or replacement. A clean and sharp drill bit enhances drilling efficiency.
Next, focus on the chuck mechanism itself. Over time, grime can build up, causing the drill bit to loosen during use. Check for any signs of rust or debris. Lubricate the chuck with a few drops of machine oil. This helps in smooth operation. When reassembling, ensure the drill bit fits snugly in the chuck. A loose fit can cause vibrations and affect performance.
If the problem persists, reflect on your drilling technique and the materials you are working with. Sometimes, the issue lies not in the drill but in how it is being used. Use appropriate pressure and speed for the task. Experimenting with these factors can lead to better results and a more reliable drill.
Troubleshoot the Internal Components and Wiring
When dealing with a drill that won’t start, it’s crucial to troubleshoot the internal components and wiring. Start by inspecting the power cord. Look for frays or breaks. A damaged cable can disrupt power flow and render your drill useless. If the cord looks fine, check the connections inside the handle. Loose or corroded wires can prevent the drill from operating. Carefully open the handle to examine these components, ensuring the power is off to avoid electric shock.
Next, inspect the motor and switch. The motor may have burnt out or the switch might be faulty. Both issues can often be identified by a noticeable burnt smell or lack of response. Use a multimeter to test the switch for continuity. If the switch fails, it will need replacing. Additionally, don’t forget to check the brushes. Worn brushes can fail to make adequate contact with the motor. Replace them if they appear short or damaged. As you troubleshoot, document your findings. This record can help diagnose the drill's issues more effectively in the future.
Seek Professional Help or Replacement Options when Needed
When your drill stops working, it’s frustrating. Sometimes, DIY repairs can buy you time. However, know when to seek professional help or explore replacement options.
Identify the issue with your drill. Check the battery first. A weak battery may need charging or replacement. Inspect the cord for frays or damage. Look for any debris or dust in the motor. These small steps can reveal simple fixes.
If the drill still isn't operational, consider professional repairs. Skilled technicians can troubleshoot complex problems. They have the tools and experience to fix internal issues. Alternatively, explore replacement options. Modern drills come with advanced features. Buying a new model might save time and effort.
Tip: Invest in regular maintenance to prevent future issues. Clean your drill after each use. This simple habit can extend its lifespan. Remember, sometimes replacement is more cost-effective. Consider your options carefully before deciding.
How to Fix a Drill That Is Not Working Easily? - Seek Professional Help or Replacement Options when Needed
| Issue |
Possible Cause |
Solution |
Professional Help Needed? |
| Drill Won't Turn On |
Dead Battery or Faulty Connection |
Check Battery Charge and Connection. |
No |
| Drill Overheating |
Blocked Ventilation or Excessive Use |
Allow Cooling and Clean Vents. |
No |
| Drill Making Odd Noises |
Worn Gear or Loose Components |
Inspect Gears and Tighten Components. |
Yes |
| Drill Not Holding Bits |
Chuck Issues or Damage |
Replace Chuck or Repair. |
Yes |
| Battery Won't Charge |
Faulty Battery or Charger |
Test with a Different Charger. |
Yes |
Conclusion
If you are wondering how to fix a drill that is not working, the process starts with identifying common symptoms such as lack of power or unusual noises. Once you recognize these signs, inspect the power source and battery for any issues, ensuring they are fully charged and properly connected. Next, examine and clean the drill bits and chuck mechanism, as dirt or debris can impede performance.
If the drill still fails to function, troubleshoot the internal components and wiring, looking for loose connections or damaged parts. In cases where the issue persists, it may be necessary to seek professional help or consider replacement options. By following these steps, you can troubleshoot your drill effectively and restore it to working condition.